S2000 Aerodynamics
This is a summary of my thoughts on S2000 aerodynamics. I am not
an engineer but as a career pilot I have studied subsonic and supersonic
aircraft aerodynamics. I also highly recommend the book
Competition Car Aerodynamics
for an in depth look into the subject of automobile
aerodynamics.
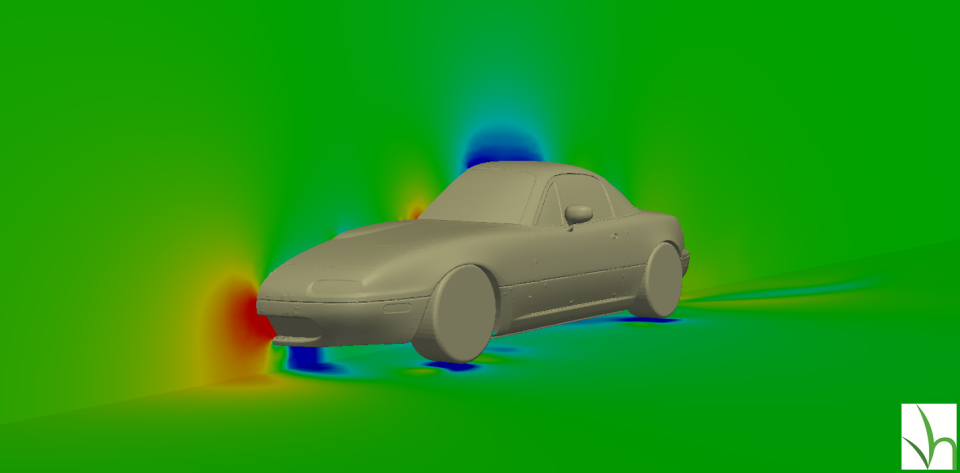
NASCAR Computational Fluid Dynamics (CFD) Surface Pressure Plot
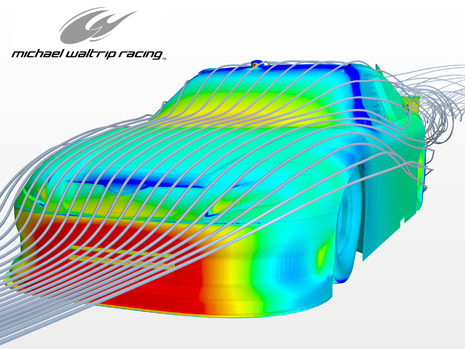
In the CFD pressure plot above note these standard pressure areas common to most cars: very high pressure (red) bubble on the nose of the car, the slight low pressure (aqua) over the hood, the moderate pressure (yellow) bump at the hood/windshield junction and the very low pressure (dark blue) area above the roof of the car where most of the lift is generated. Graphic by Michael Waltrip Racing.
Wing
There's no doubt the S2000 greatly benefits from a rear wing.
Everything from the stock CR S2000 rear wing to huge roof level wings have
successfully been used on track. After running over a year with an APR GTC-200
wing I removed it and a small APR front splitter to qualify for a NASA TTC
time trial. My lap times were 1.5 seconds slower without the aero aid and the
car was scary light & loose around the track's three high speed corners (I still
won the TT though ![]() ).
A wing should definitely be your first aero add-on for the S2000.
).
A wing should definitely be your first aero add-on for the S2000.
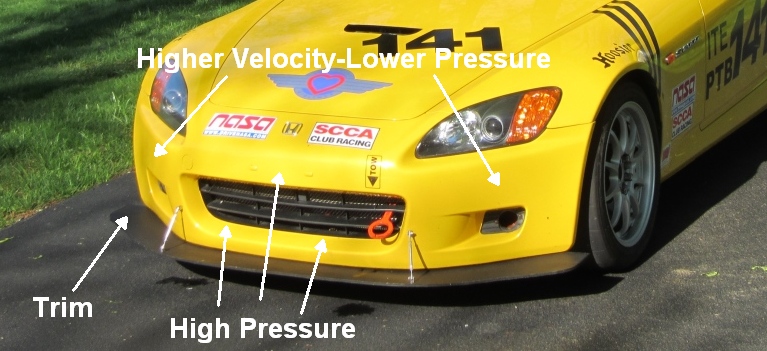
The S2000 has a tendency to understeer on fast corners at full throttle when running a wing. Adding a splitter to the front bumper is a great way to help restore some high speed aero balance. To get the full benefit of a splitter it needs to be at a low 3 inches or less above the ground so that air flowing below the splitter will create downforce but at that height very stiff springs are required to keep it from hitting the ground under heavy braking when the nose pitches down. But even at stock ride height a splitter will be beneficial because the high pressure on top of the splitter will create downforce.
Honda 2004+ OEM Optional Wing
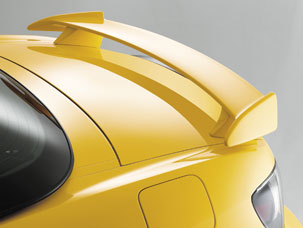
I've never seen one in person but it looks like it would be functional.
Note that it is possible to tune the low speed and high speed handling separately by adjusting the car's aerodynamics for high speed handling. You can use the normal suspension tuning (alignment, sway bars, shock settings) to make the car oversteer on slow corners to help you rotate the car, but run extra rear downforce so it under steers slightly at high speed because high speed oversteer is pretty scary and usually leads to overly cautious driving and slow lap times.
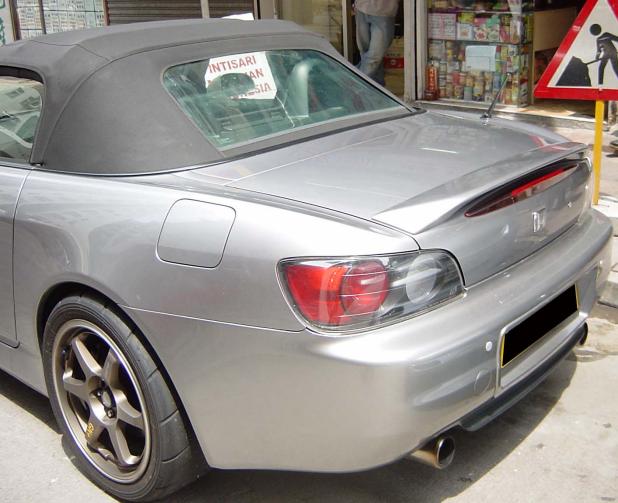
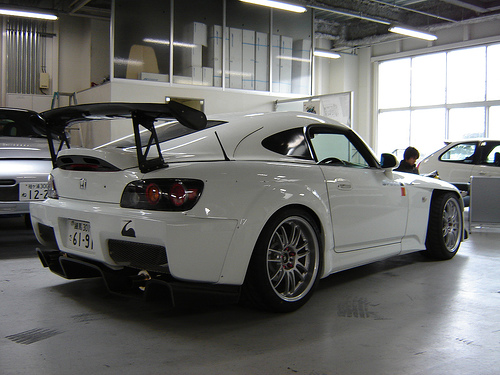
S2000 CR Wing
The CR wing is a medium mount, 3D profile wing with good size end plates. It has proven to be an effective track wing for racing and time trial.
A wing can be adversely affected by anything that upsets the airflow over the hood, windshield or roof of the car. Placing a GoPro camera on your windshield can reduce the effectiveness of your wing. Removing your windshield wipers may smooth out the airflow enough to add some wing generated downforce.
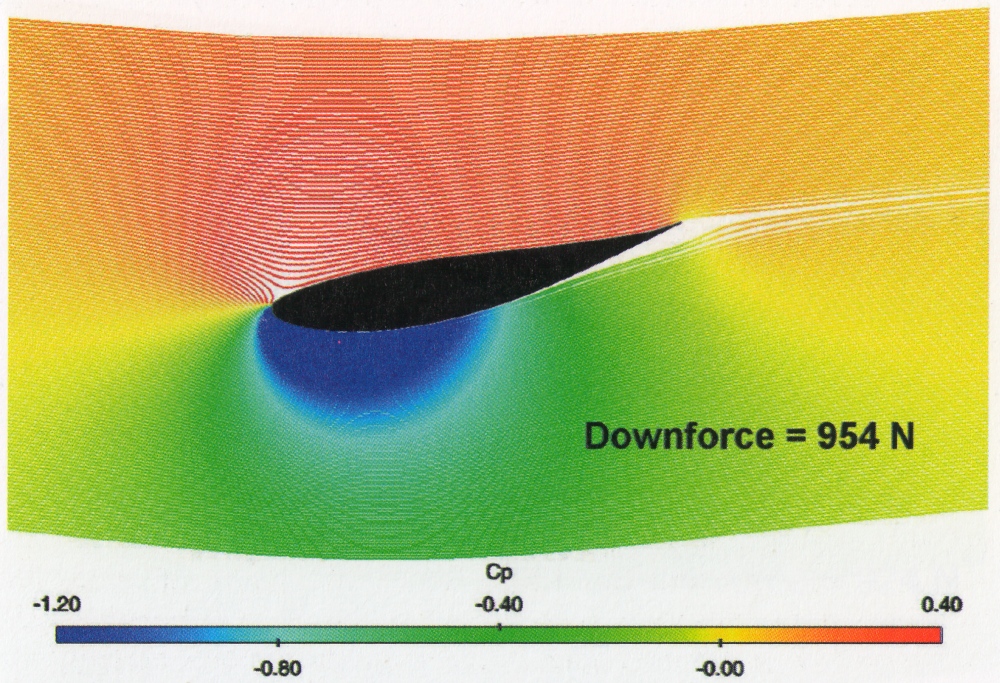
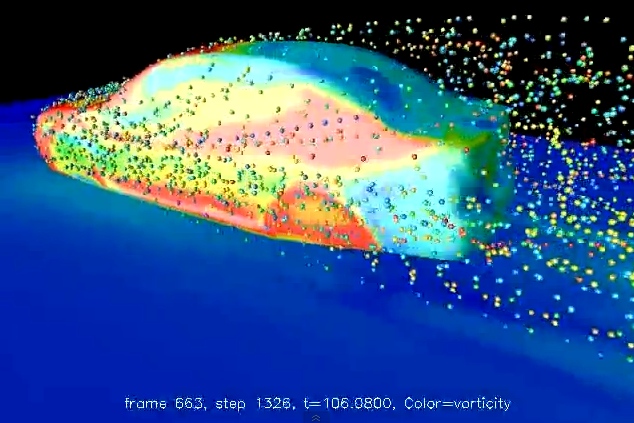
Wind Tunnel Testing of Airflow Below Mid Level Wing on Lotus

Wing end plates prevent the high pressure air above the wing from spilling around the edge of the wing. By keeping the high and low pressure areas separate the wing will be more efficient. After researching wing pressure plots (graphic below) I decided to move my APR GTC-200 wing's custom end plates forward and slightly lower after seeing that the low pressure under the wing can actually extend forward of the wing. You can also see how much stronger the low pressure under the wing is compared to the high pressure above the wing so end plates should extend farther below the wing than above.
Recommended Reading
CFD Generated Wing Pressure
Plot
Side view of wing. Blue is low air pressure, red is high pressure. Graphic by Hancha Group Consulting.
The plot above also suggests the original APR GTC-200 wing end plates are not backwards after all.
Stock APR GTC-200 Wing with Standard Riser & End Plates

The GTC-200 wing is the most popular wing for the S2000. It has a 3D profile to minimize wing stall in the center of the wing and an optional riser can get it higher off the deck lid (risers not shown in pic above). Note the large soft top ridges which cause turbulence, drag and dirty airflow to the wing. A hard top is lighter and smoother which decreases drag and increases the efficiency of a wing.
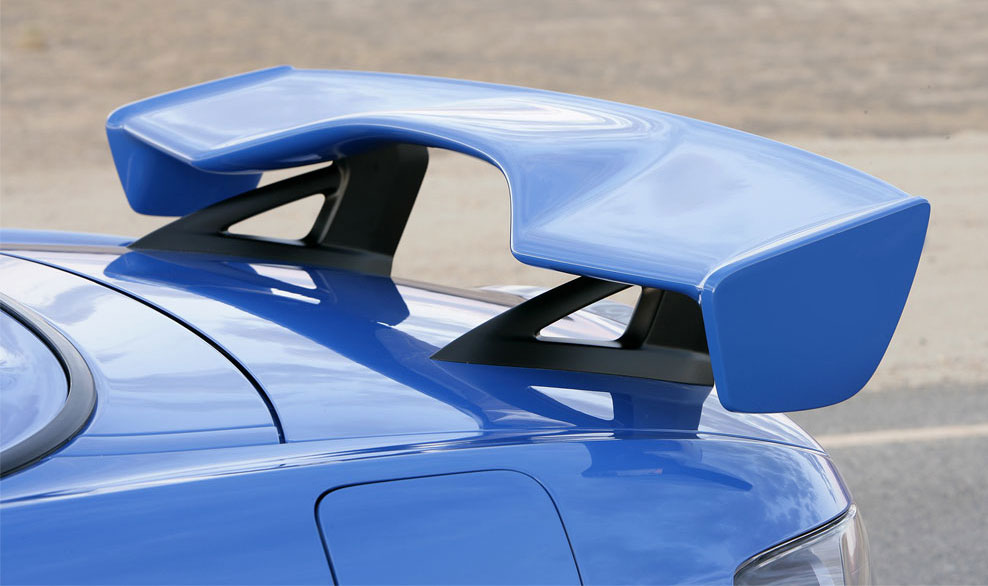
APR GTC-200 Wing with 2 1/2 inch Risers & 12x12 inch End Plates
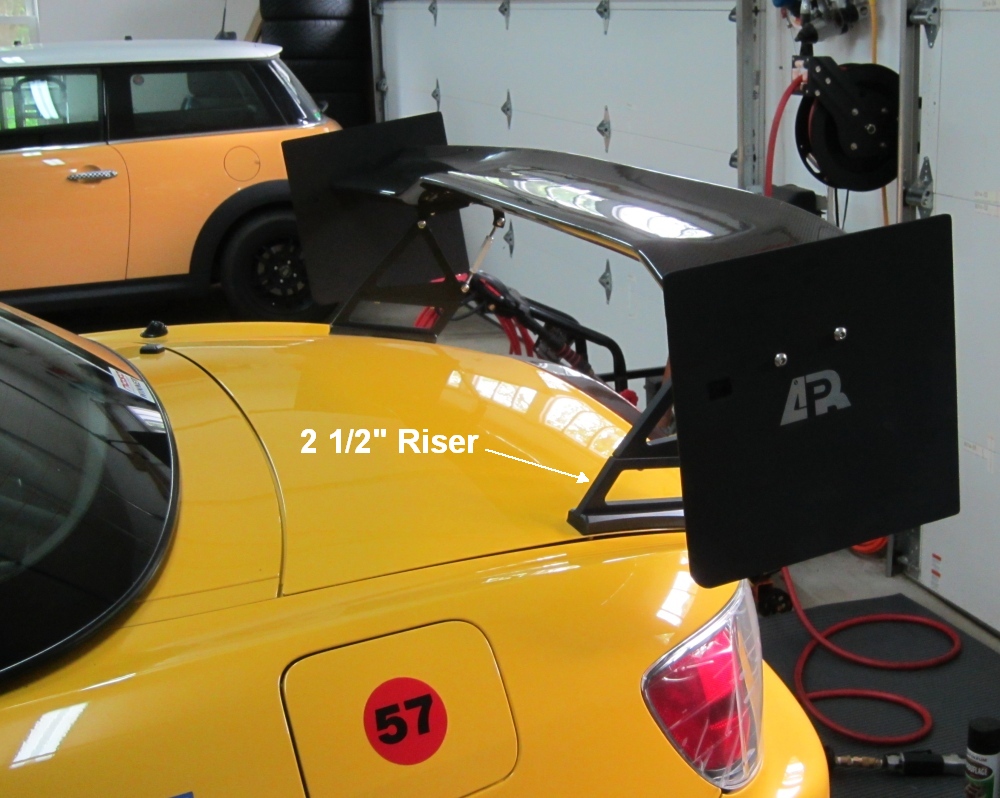
When considering wing end plate size, bigger is better until you get to crazy big, like larger than F1 wing mounts/endplates so my 12x12in end plates (max NASA PTx size) will not be trimmed. The large end plates also act as yaw stabilizers in a skid. Another possible benefit is they may act as vertical wings and create low pressure on the wing side of the end plate which would augment the low pressure created by the wing. As air on the side of the car flows past the hard top it will tend to flow inward over the trunk lid. This inward flowing air will flow around the end plate like a flat wing with high pressure on the outside and low pressure on the inside surface.
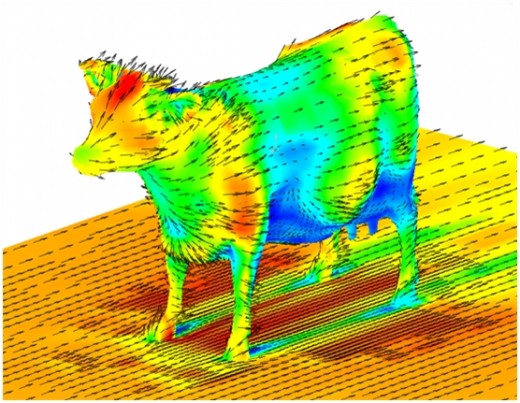
Airflow Over the Miata and Through the Wing
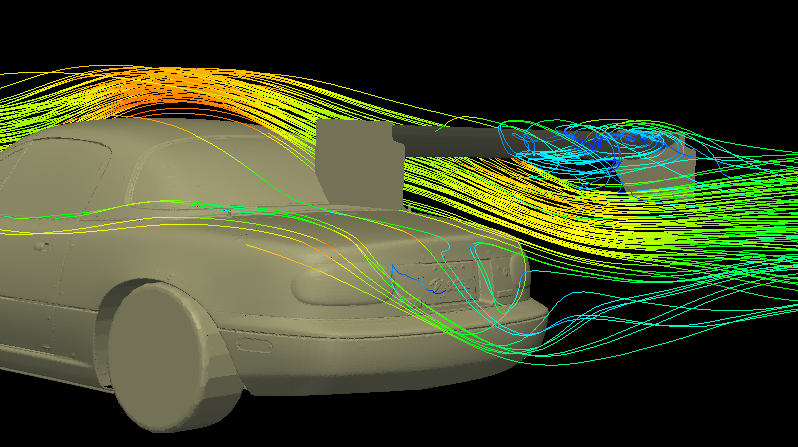
Graphic by Hancha Group Consulting.
Note the stall condition on the center of the wing in the graphic above. Even at almost roof height this wing's center section is stalled out. The downward flow of the air coming off the center of the hard top may be creating too great an angle of attack and causing the stall/loss of downforce. A 3D wing, such as the APR GTC-200, reduces the angle of attack at the center of the wing for this very reason. Most of a wing's downforce is created on the outside 2/3's where the airflow is relatively clean and flat.
More Wing!
Splitter
If your S2000 has a wing it should have a splitter to help aerodynamic balance. I have tested my S2000 race car (with rear wing) using four different size splitters. A small APR fiberglass splitter with about 1.5 inches of extension ahead of the bumper, a huge 7 inch splitter made of 3/8 inch plywood, a 2 inch Honda Challenge legal plywood splitter and my current 4 1/2 inch plywood splitter. The only change that made an appreciable difference in handling or lap times was when I trimmed my 7 inch splitter down to 2 inches. My lap times immediately dropped by over a second. The large splitter must have been generating excess drag.
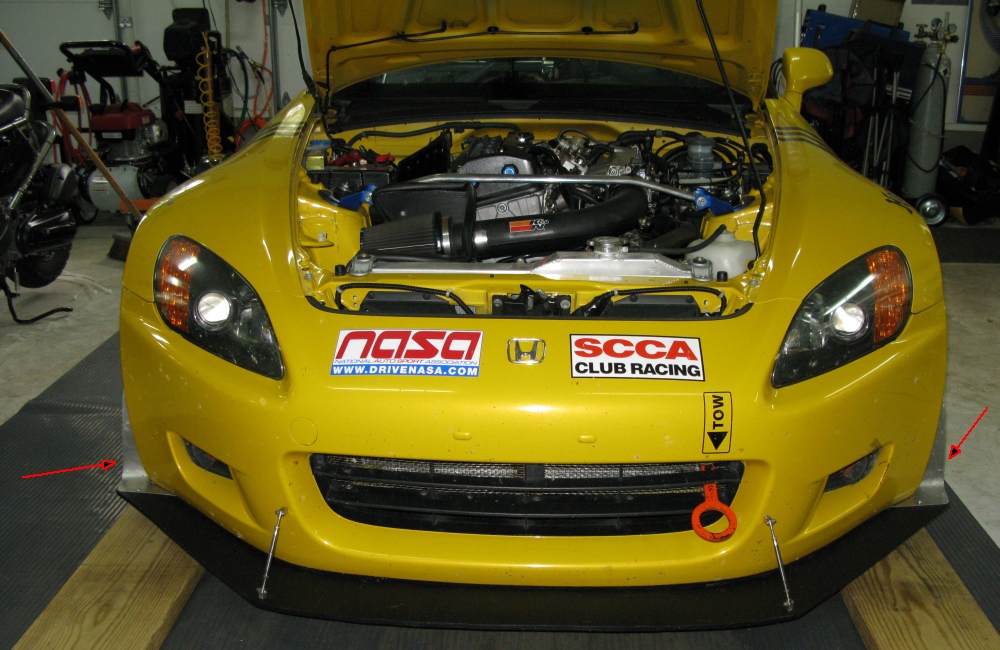
My Current Splitter Before Modification to Extend Airflow Around Front Tires
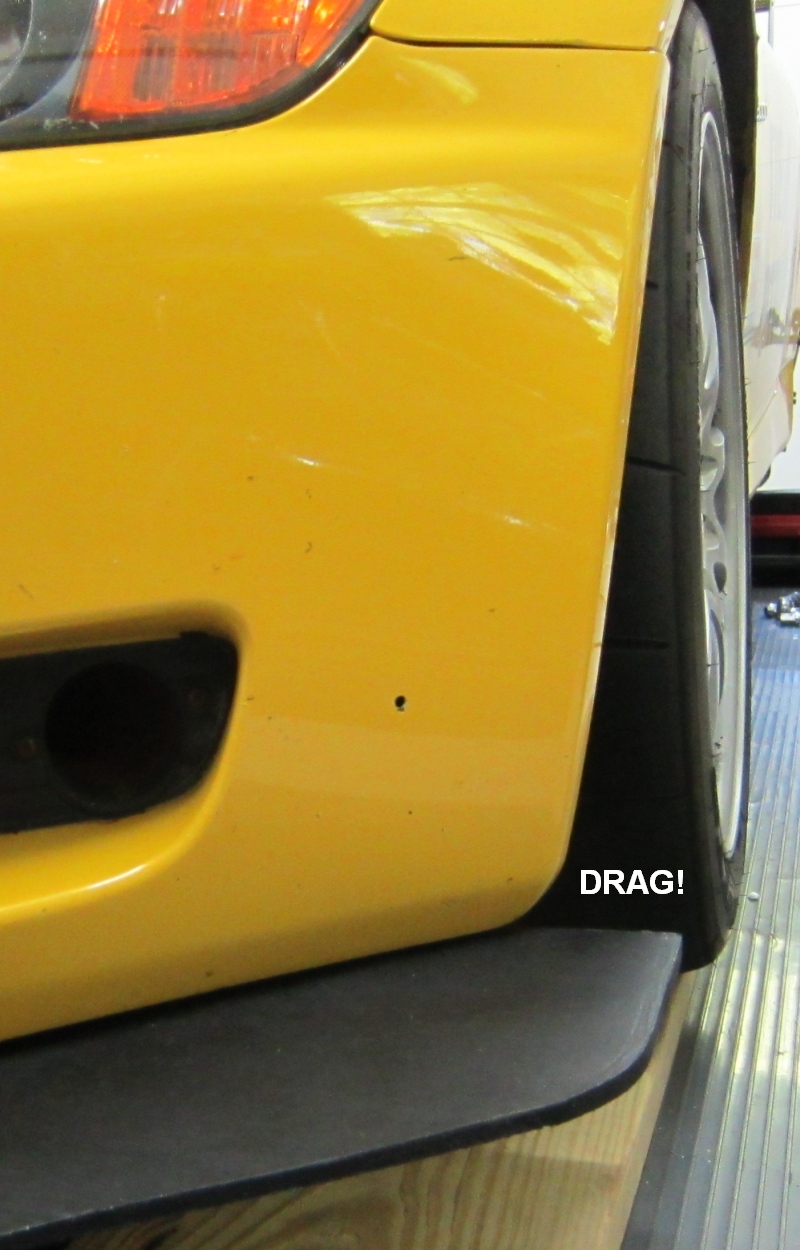
Notice how CE28 17x9 +63 offset wheels and 255/40/17 tires extend well beyond front bumper and take a direct hit from high speed airflow coming around the nose and off the splitter.
I added splitter dams to my splitter's outside edge to bumper junction to try and keep the very high velocity air spilling around the splitter/bumper junction from hitting the front tires. The S2000's nose shape will cause even more air to flow around the sides of the car than the Ford Fusion NASCAR in the CFD diagram below. Running wider than stock front tires will increase the drag caused by this side airflow because the tires extend out into the airstream. I run a square 255 width tire setup (stock is 205) and the front tires extend over three inches outward beyond the front bumper.
In the book, Competition Car Aerodynamics, by Simon McBeath (yea, tell your friends you enjoyed reading McBeath) he discusses how splitter dams (he refers to them as a "vertical fence") increase downforce by creating a high pressure area on top of the splitter in front of the dams--so they are a win-win with less drag than bare tires in the airstream plus additional splitter downforce.
4 1/2 Inch Splitter With Splitter Dams
Unpainted aluminum splitter dams fitted to increase downforce on splitter and reduce drag from airflow off the splitter-bumper junction onto the front tires.
Ford Fusion NASCAR Velocity Plot
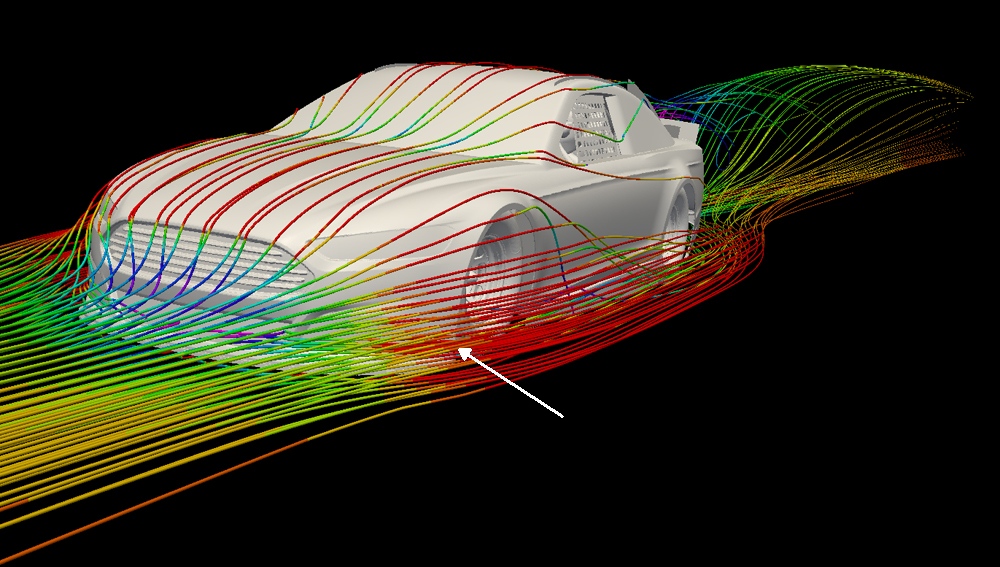
White arrow points to high velocity (red) airflow at splitter/bumper junction. Red is high velocity, yellow is normal, blue & green low. Normally high velocity = low pressure and low velocity = high pressure. The S2000's tires extend beyond the front bumper into the airflow. Running wider front tires will significantly increase this drag. Graphic by Michael Waltrip Racing.
The drag caused by this very high velocity airflow striking the tire may be the reason why my Mongo (very large) splitter was so slow. It extended five inches beyond the side of the body which would increase the airflow onto the tire. There seems to be no benefit to extend a splitter beyond the outside edge of the car (unless you add tire blocking splitter dams like above) and this may indeed increase turbulence and drag. Almost all race car splitters without end plates match the width of the splitter to the front bumper.
The graphic above also hints at what the optimal shape of an S2000 splitter might be. Because the S2000's nose is somewhat arrowhead shaped the highest pressure air will be around the flat center area. This is where the splitter should extend the most. As the airflow moves laterally to the angled part of the nose it will accelerate and the pressure will drop on top of the outside part of the splitter so the splitter need not extend as far in this area.
S2000 Nose
Sharply angled nose reduces high pressure area in front of car to reduce drag.
Mongo 7 inch Plywood Splitter
I dropped my lap time over a full second when I trimmed this monster splitter down to 2 inches. It was generating much more drag than downforce. Note how the splitter extends 7 inches forward and 5 inches beyond the side of the bumper. Also note the 12x12 inch rear wing end plates. I moved them forward and slightly lower from this position for more wing efficiency and less drag.
A recent study found no increase in drag when a splitter was increased from 4 to 6 inches of extension so something else caused the Mongo splitter's rise in lap times. Another possibility is increased drag due to splitter flex.
The graphic below is a comparison between a car with an air dam alone and an air dam with a splitter. The S2000's straight drop nose is similar to a shallow air dam so the graphic is relevant. Red is high pressure, blue is low. You can see how the splitter reaches out and chops off the bottom of the high pressure (red) bubble on the nose of the car. The high pressure also concentrates on top of the splitter which pushes it downward for downforce. The airdam alone creates a lot of low pressure under the car so adding the splitter doesn't add much more low pressure but it does move the low pressure forward which will put more pressure on the front wheels (but reduce pressure on the rear wheels).
CFD Pressure Plot Comparing Air Dam alone to Air Dam + Splitter
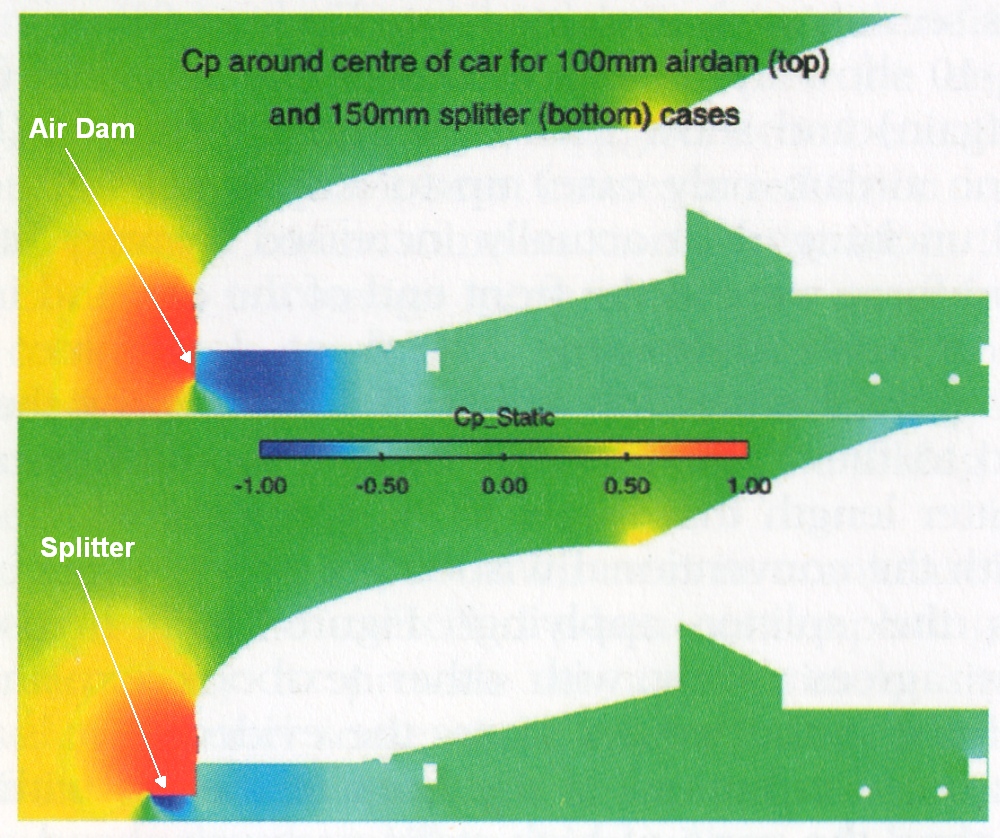
Note how the high pressure (red) bubble sits on top of the splitter adding downforce. The underside of the splitter also generates low pressure (blue) and downforce but the splitter needs to be lower than about 3 inches to generate this low pressure area. Graphic by Hancha Group Consulting.
There also seems to be consensus that 100mm of splitter extension (about 4 inches) is the sweet spot.
The rear edge of the splitter should be gently tapered upward so it will act as a "mini diffuser."
Spoilers
Deck lid spoilers can be beneficial in three ways: They can reduce lift, generate downforce and reduce drag. I'm considering attempting to bend some 1 inch aluminum angle stock to follow the shape of the top of the rear trunk edge between the wing supports to act as a short deck lid spoiler to add some downforce with very little added drag. I'm going to initially try a 30º spoiler angle. Deck lid spoilers reduce lift by "spoiling" the airflow forward of the spoiler--over the trunk and rear of the top--so a low velocity, high pressure pool of air stagnates there, replacing the high speed, low pressure air that would normally be there creating lift.
Deck Lid & Brake Light Shaped Into Functional Spoiler
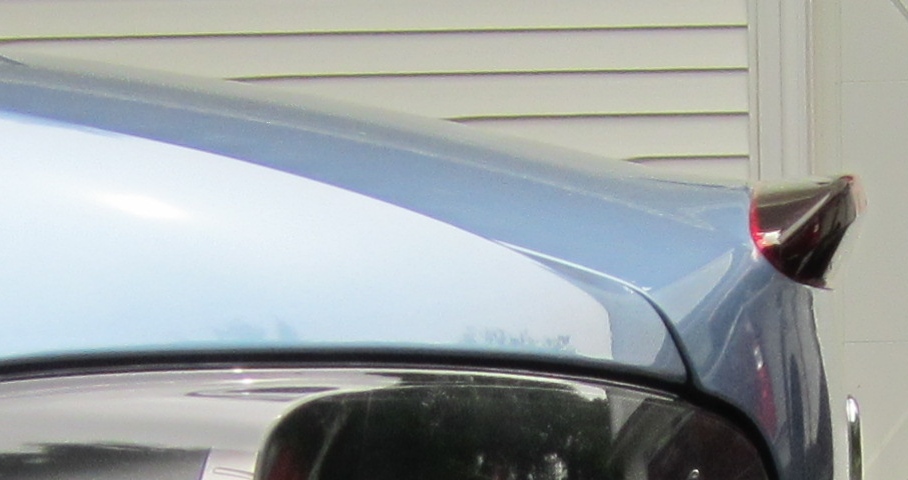
Honda OEM Deck Lid Spoiler
Spoiled Airflow Forward of Deck Lid Spoiler
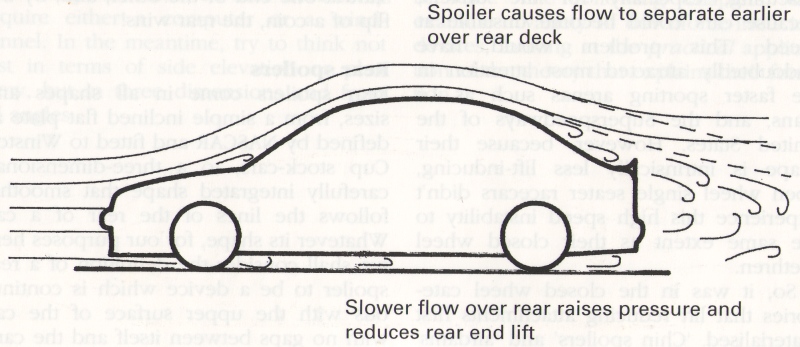
Even the small OEM S2000 deck lid spoiler should reduce lift.
Deck lid spoilers generate downforce when they deflect the airflow over them upward. Smaller spoilers at low angles (< 30º) can also reduce turbulence and/or low pressure behind the car and actually reduce drag.
Deck Lid Spoiler Reducing Drag by Reducing Low Pressure Behind Car
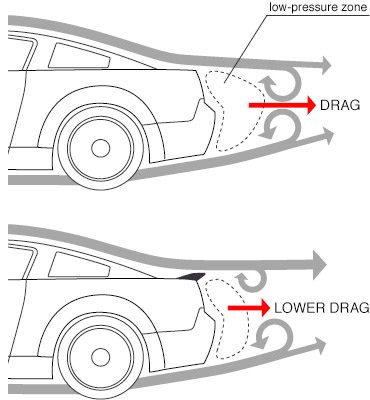
Graphic by Ministry Of Wheels
The low pressure area behind the car (dashed area) pulls on the car as drag.
Other Aerodynamic Aids
Running a hard top will smooth the airflow over the roof and to a wing or deck lid spoiler and reduce drag. But smoothing the airflow has a slight detrimental effect of increasing the lift generated by the roof. Another aero benefit of a hard top is the rear roof/trunk lid junction is smoothed out and moved rearward which also helps the airflow to a wing or deck lid spoiler. The rear interior of the soft top can also pressurize (caused by air flowing into the open windows) and flap around which can disrupt airflow over the top. Removing the soft top and it's extension mechanism will also reduce the cars weight.
Extending the S2000's leading edge of the bumper downward buy installing an air dam would be very beneficial. Air dams create a very low pressure area behind them which creates downforce and they also reduce the airflow under the car which decreases drag. The combination of an air dam and splitter is even better (see Miata Aerodynamics below). Putting a spacer between the bumper and splitter is the easiest way to accomplish this on the S2000.
A rear diffuser must run very low to the ground to be effective so for an S2000 to truly benefit from a diffuser it needs to be very low and run a very stiff suspension. Smooth airflow under the car will also greatly improve the effectiveness of a diffuser so a flat under tray is desirable.
A flat under tray has a dual benefit of reducing drag and if low enough creating downforce but it's a difficult and/or expensive option. Combine a flat bottom with a little forward rake and you can create a diffuser effect. You can also screw up your engine, transmission and differential cooling airflow if you don't know what you're doing. When run low enough a flat under tray will produce downforce. Flat under trays are expensive and must be removed to perform most under car maintenance.
S2000 Under Tray
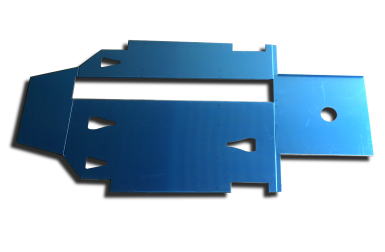
Lists for $2000 before shipping from Japan.
I added a small central hood vent to take advantage of the low pressure area over the top of the hood. The low pressure helps extract hot radiator airflow from the engine bay and should help increase the airflow through the radiator. The S2000 tends to run very hot oil temperatures on track so extra cooling is a good thing.
The hood vent will also reduce the lift generated by the hood and should also help clean up the airflow under the car because less engine compartment air is forced to flow out the bottom of the engine bay. Adding radiator ducting to direct radiator outflow up to a large hood opening can have a dramatic effect on undercar downforce and drag. Overall a hood vent is a win-win-win modification.
Hood Vent

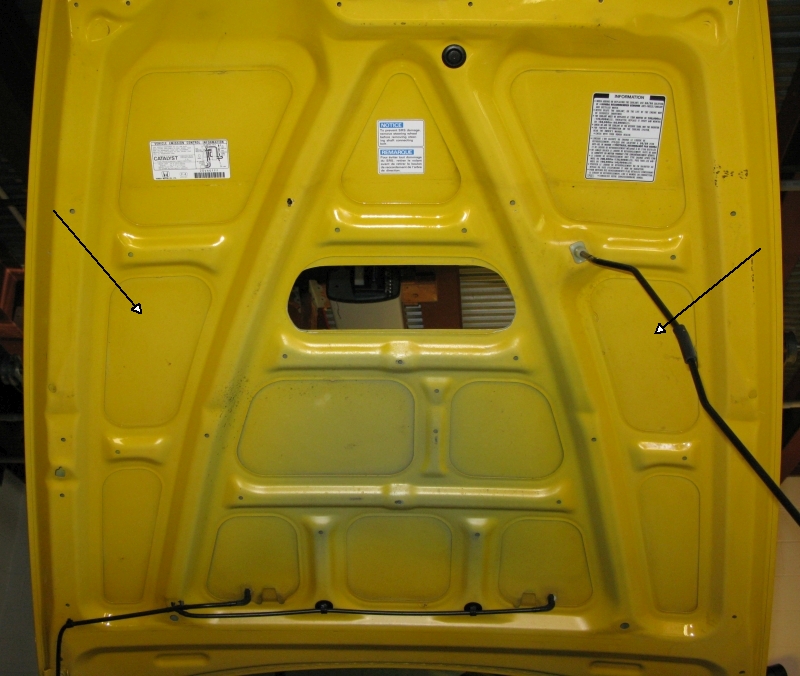
Arrows point to best locations for additional venting.
I have 2 1/2 inch brake ducting tapped at the front bumper recesses. Brake ducting greatly enhances brake pad life and reduces the possibility of brake overheating and fade.
My interior panoramic rearview mirror gives a very good view of the right side of the car so I removed the passenger side rearview mirror (reducing weight and drag).
I'm considering adding some small aluminum dive planes to the front bumper. With so much lateral air flow around the S2000's nose the dive planes should work well to add some downforce to help balance the rear wing's downforce.
S2000 CR Bumper with "Dive Planes"
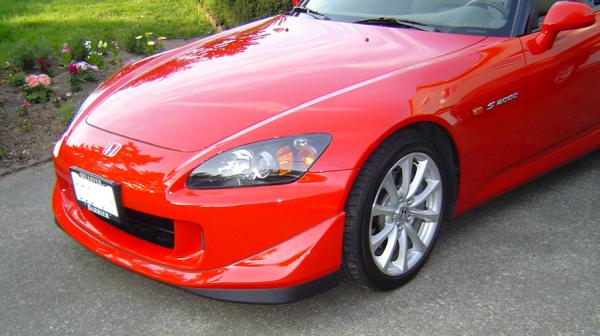
Because of the high speed horizontal airflow along the outside of the front bumper the "dive planes" on the CR bumper most likely are very functional and do add downforce. The bumper extensions also help block airflow around the front tires to reduce drag.
I considered venting my rear bumper to allow wheel well and underbody air to flow through. I did some testing with the rear bumper cover completely removed and my top speed was not affected at all so I decided not to bother cutting up my bumper.
The "Fastback" S2000 hard top looks to be very effective in reducing the pressure, turbulence and drag at the normal car's roof & trunk lid junction. This would allow the rear wing to get much cleaner air resulting in a more efficient wing (run a flatter wing with less drag). The Fastback hard top also has a nice lip spoiler that would tend to add some downforce and possibly reduce drag.
S2000 Fastback Hard Top & Rear Diffuser
Excellent CFD Generated Animation of Airflow Video
Click image to play
CFD Velocity Plot of the New Ford Mustang
Note the blue low pressure area below the udder.
Mazda Miata CFD Generated Aerodynamic Info
by Hancha Group Consulting
Of course the Miata isn't a perfect match for the S2000 but it's close enough to glean some good info.
CFD Models Plotted Below
1. Stock 1990-1997 (first generation) Mazda Miata
2. Stock 1990-1997 Mazda Miata lowered to a 4 inch Ride Height
3. Small Front Air Dam at 4in Ride Height
4. Small Air Dam with Splitter at 4 in Ride Height
5. Large Air Dam at 4in Ride Height
6. Large Air Dam with Splitter at 4in Ride Height
Note: The air dam and/or splitter is 2 inches off the ground in study 3-6
The Hancha Group created the following graphs and tables using the free Openfoam Computational Fluid Dynamics (CFD) software and Paraview. The following text in this article is by Rob Robinette.
Air Pressure Plots @ 100mph
Setup 1, Stock 1990-1997 Miata
All graphics in this section by Hancha Group Consulting.
In the CFD pressure plot above note these standard pressure areas: very high pressure (red) bubble on the nose of the car, the very low pressure (blue) under the nose, the slight low pressure (light blue) over the hood, the moderate pressure (red & yellow) bump at the hood/windshield junction and the very low pressure (dark blue) area above the roof of the car where most of the lift is generated.
For this stock Miata above there is a slight low pressure under the nose (blue) and the very high pressure spike (red) in front of the front tires and compare to the plots below. The high pressure on the front tires is why the S2000 comes with front tire wind blockers under the nose. The high pressure spike at the hood/windshield junction is why it is common practice to use this area as the cabin air vent source. It's also the reason why many racers remove their windshield wipers.
Take the low pressure areas under the mid and rear sections of the Miata model in these graphics with a grain of salt. This simplified model has an almost flat bottom which will generate downforce if low enough to the ground.
Setup 2, Stock But Lowered to 4 inch Ride Height
Note the much more pronounced low pressure area under the nose and much less pressure in front of the front tires.
Setups 3 through 6
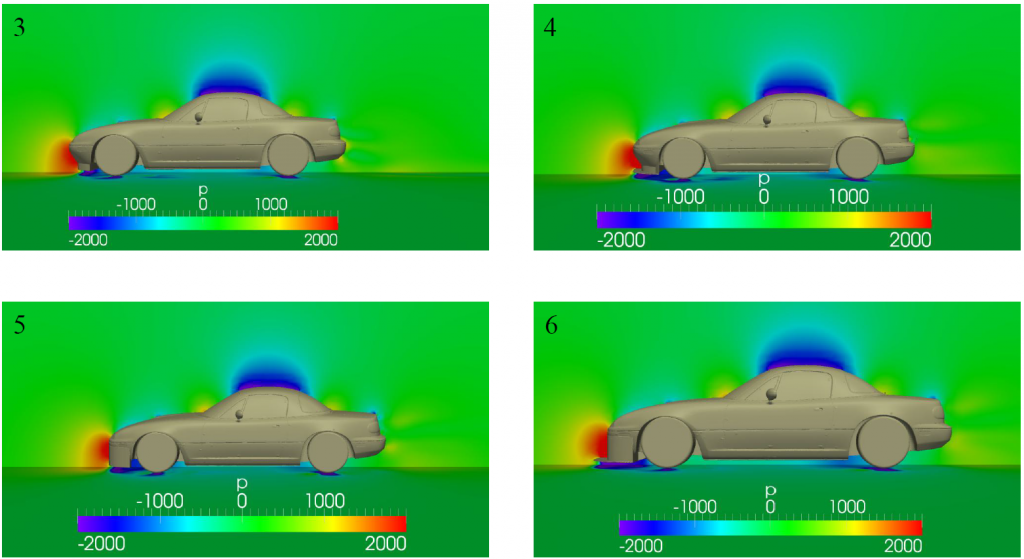
#3 has small air dam, 4 has small air dam + splitter, 5 has large air dam, 6 has large air dam + splitter. Setup 6 (large air dam + splitter) has a very low pressure area under the entire splitter and generates the most downforce and least drag.
Pressure Below Car
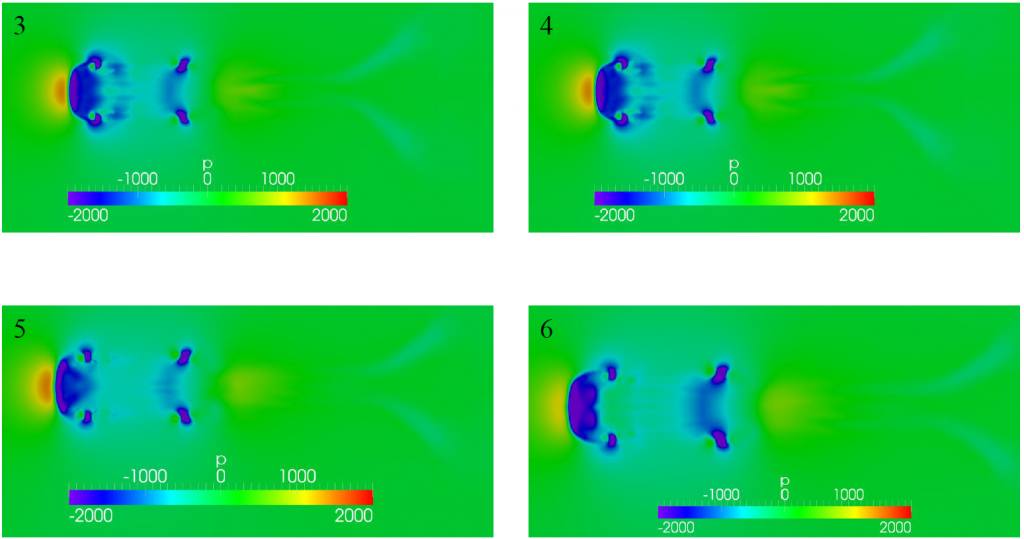
Note the large, very well formed low pressure area under the splitter in setup 6 (large air dam + splitter).
Velocity Plots
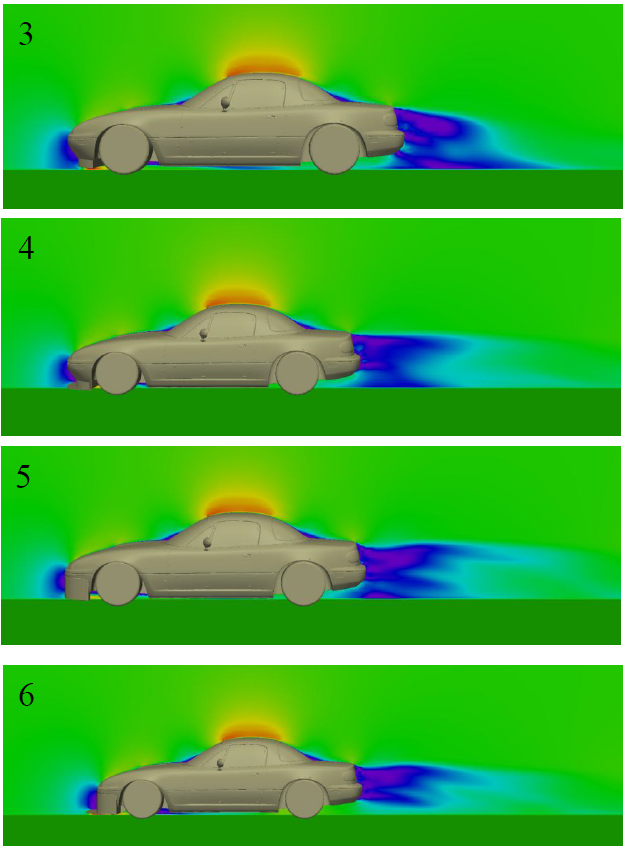
High velocity airflow is red & yellow, low is light blue, blue & purple. Note how the downforce created by setup 6 (large air dam + splitter) alters the shape and speed of the airflow behind the car. Good front aero can make a rear wing and rear diffuser more effective.
Miata CFD Summary Table
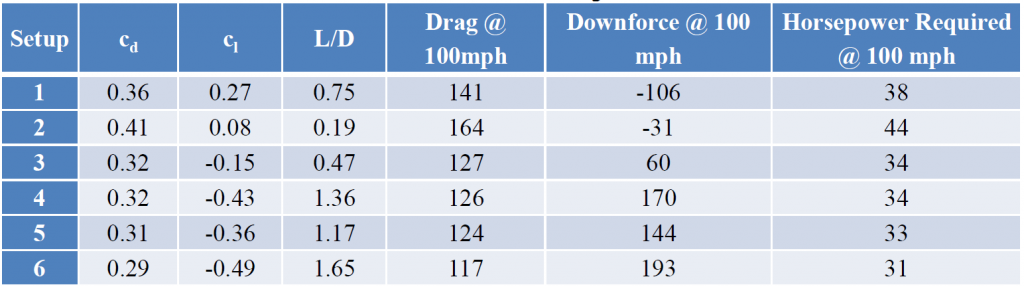
cd is coefficient of drag, cl is coefficient of lift, L/D is lift over drag--a measurement of efficiency with larger being better
In the table above I was surprised to see drag increase when the car was lowered (setup 2). I have always assumed that a lowered car presents a smaller frontal area so there would be less drag. Note also the lift (negative downforce) was greatly reduced from -106lbs to -31lbs by simply lowering the car. I believe these two results--greatly reduced lift and increase in drag--are simply products of the model's simplified (almost flat) underside. If you compare the stock and lowered pressure plot graphics above (setup 1 & 2) you see the pressure above the car is almost identical so there must be downforce generated under the car to explain the majority of the 75lb decrease in lift. The underside of a real Miata is too messy to generate almost 75lbs of downforce by simply being lowered.
Keep in mind this model Miata and most other CFD models have their windows up while most amateur track/race cars have to run with the windows down or removed. This would definitely increase the coefficient of drag and could disrupt the airflow to downstream aero devices such as the rear wing.
Summary of Findings
Adding an airdam (setup 3 & 5) added downforce and reduced drag.
Adding a splitter (setup 4 & 6) added more downforce and reduced drag.
The combination of the large air dam and splitter (setup 6) created the least drag and most downforce--a definite win-win.