How To Install a Big Brake Kit
(and Replace the Brake Rotors)
By Rob Robinette
Do you need bigger brakes?
The stock 3rd gen RX-7's brakes work fine for everyday sports car driving but on the race track when exposed to continual high speed deceleration the 11.5 inch diameter by 0.8 inch wide vented front brakes are shown to be a weak link. The stock brake rotors are too small, thin and retain too much heat. The heat is transferred to the brake calipers which in turn heats the brake fluid beyond its boiling point. When the brake fluid boils the gas bubbles in the brake lines compress and absorb the pressure placed on it from the brake master cylinder. The brake pedal gets spongy and you experience brake fade.
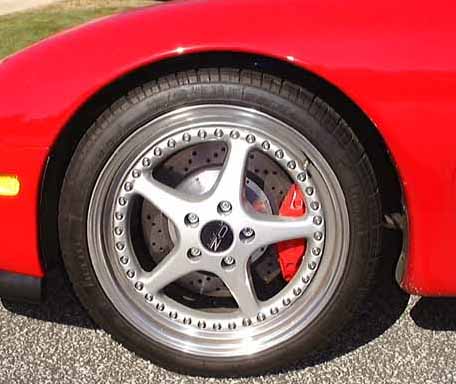
The Mandeville Autotech Big Brake kit with 18 inch OZ Mito Modular wheels
Hot brakes can warp your rotors and Sandy Linthicum fried his front wheel bearings after 40 hours of track time because the stock rotors got and stayed too hot. The small brake cooling ducts in the R1 chin spoiler don't help much and a more direct form of brake cooling would be beneficial, but nothing beats more "swept" area for the brake rotors. Brakes work by converting the car's kinetic energy to heat and the larger the rotor (the larger the swept area) the more rotor you have to dissipate heat. Converting the front brakes to a larger rotor (usually 12 ¾ to 13 inches in diameter) is the best way to prevent brake fade and damage caused by overheated brake rotors. Larger rotors also give the calipers more leverage to work with.
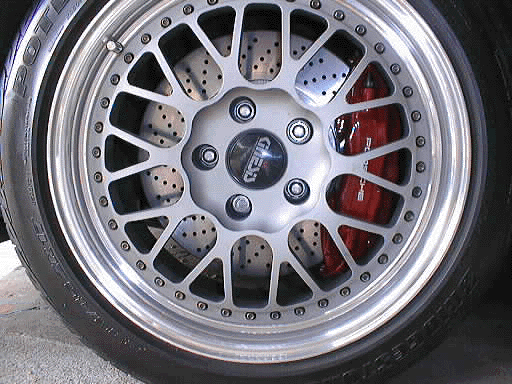
Ultimate Garage/Move It/Porsche Brembo upgrade with 17" wheels, rotors are 12.67x1.25 inches (about $2,800)
Note: An RX-7 with upgraded rotors and calipers will not stop any shorter than stock until brake fade is encountered--as long as the stock brakes can lock-up and activate the Anti-lock Brake System (ABS) system--the stopping distances will remain virtually the same as stock. After repeated stops (or possibly one stop from very high speed with race tires) an upgraded car will out perform a stock braked car. Braking distance will immediately improve when tires with more grip are used because more tire grip will allow more deceleration before and during skidding (ABS operation). The bottom line is a big brake upgrade is a benefit experienced only during track style driving, although there is always the aesthetic benefit of large rotors behind the spokes of your wheels.
A potential downside of a brake upgrade is increased brake pedal travel. If the big brake kit has larger (or more) brake caliper pistons than stock, more brake fluid will have to be pushed through the brake system to move the pistons. Some people have upgraded the brake master cylinder to the larger one from the 93 Mazda 929. See the 929 Master Cylinder Install How To. I upgraded my master cylinder just to get a shorter, firmer brake pedal stroke.
The brake bias may also shift to more front brake bias because a larger front rotor gives the caliper more "leverage" to stop the wheel. This bias shift may be offset by the new larger caliper's requirement for more brake fluid flow (more pedal movement). The ABS system will mask this problem by activating on the front brakes until enough brake pressure is applied to the rear brakes to cause them to activate the ABS too. You can install a brake proportioning valve to tweak the bias back to the point where the front brakes lock-up just before the rears. With the Mandeville upgrade I had to dial down the front brake pressure with a proportioning valve to prevent the front brakes from locking up much earlier than the rears. See the Brake Proportioning Valve Install How To.
Warning
Don't install a big brake kit yourself unless you are a very competent mechanic. A single point failure in the brake system will result in the total loss of brakes and possible damage/injury/death! A brake shop can install a big brake kit for you.
The Mandeville Auto Tech Big Brake Kit
I followed Sandy Linthicum's lead and decided to install the big brake upgrade from Mandeville Autotech (Roger Mandeville, (864) 582-0038, rmandeville@mndspring.com, 350 Simuel Rd, Spartenburg, SC 29301, mail: PO Box 1867, Zip 29304). For $995 Mandeville sent me two 13 inch diameter by 1.1 inch wide vented rotors (not 12 ¾ like most other 3rd gen upgrades) with CNC machined aluminum rotor hats, brake caliper widening adapters, longer caliper bridge bolts, longer brake pad retaining pins, and two brake caliper extension brackets. The kit widens the stock calipers to reach around the wider rotor. The Mandeville kit uses the stock calipers because they are quality, light weight aluminum units that work great with a larger rotor. The brake rotors are custom made Coleman rotors. Replacement rotors are available from Mandeville for around $300 per pair. You can get the rotors heat treated and cross-drilled for an additional $150. An added benefit to the Mandeville kit is that you won't have to upgrade the master cylinder.
By modifying the stock calipers Mandeville can charge less than half of what everyone else charges for a big brake kit. The aluminum rotor hats reduce weight so Mandeville's rotors actually weigh less than the stock, all iron rotors. The brake upgrade works great. I did have to dial down the front brake pressure using the proportioning valve but the brakes just don't fade. You can always send your calipers in to Mandeville and he'll do the mod. The kit does requires 17 inch or larger wheels and doesn't include stainless steel brake lines. See the Brake Line Install How To.
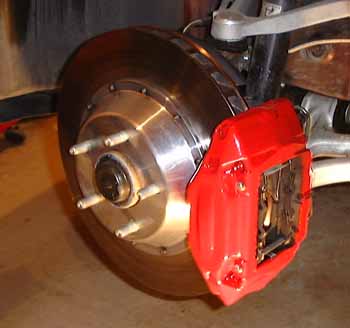
The Mandeville Autotech Big Brake Kit (with painted stock calipers)
[I will enclose info specific to the Mandeville kit in brackets.]
What's needed for the install
Hammer type impact screwdriver with large Phillips head bit (a must-have), ½ inch breaker bar for high torque bolts, large and small torque wrenches, 8mm wrench and a 10 mm flare nut wrench (you'll round off the fittings if you try to use a normal 10mm wrench--it's a good $10 investment), 14mm and 17mm sockets [Mandeville kit: 10mm and 8mm (big) Allen sockets, tin snips and grinder or power sander.]
How to install a big brake kit
Jack the car and remove the front wheels, it's best to raise the entire front end because you will have to bleed both sides after the install anyway. Turn the steering wheel to make access to the caliper easier. It's a good idea to disassemble one brake at a time so you can reference the other caliper when you're putting the caliper and brake pads back together.
Remove the brake pads by removing the brake pin M clip and then sliding out the retaining pins (hold the M springs while you slide out the pins or they may pop out). You may have to spread the pads a little to loosen them enough to slide them out of the caliper. A pair of needle nose pliers works pretty good as a spreader. Warning Do not touch the brake pedal while the pads are out.
Put down some newspaper to catch the brake fluid. Use a 12mm wrench to disconnect the brake line at the caliper (where the brake line meets the caliper's hard brake pipe) and plug the brake line. I used a small rubber vacuum hose plug.
Widening the calipers for the Mandeville Kit
[If you don't plug the line all the brake fluid will drain from the system when you split the calipers. Trust me on this one. Remove the caliper's four 14mm bridge bolts and split the caliper. I had to use a ½ inch breaker bar to loosen the bolts. Watch for the rubber ring seals that are sandwiched between the caliper halves. Install the new rubber seal rings into the circular groove cut in the caliper widening spacers and install the two spacers with the ring seal placed against the caliper half still mounted to the car. Use the new longer bridge bolts to secure the caliper halves and spacers. Make sure all four (two stock, two new) rubber seal rings stay in place while you bolt the caliper halves back together. Torque the caliper bridge bolts to 35 foot pounds]
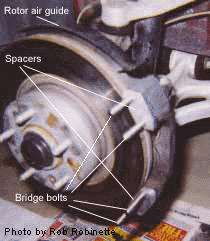
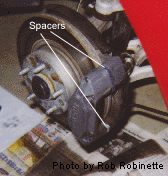
Caliper spacers and longer bridge bolts for the Mandeville install (stock rotors have not been removed yet)
How to replace the brake rotors
[Mandeville big brake kit specific instructions are in brackets]
Remove the two large 17mm bolts that hold the caliper to its mount and remove the caliper (or hang it with safety wire or a bungee in place from the coil spring). I had to use a ½ inch breaker bar to loosen the bolts. Don't mistake the caliper's four 14mm bridge bolts for the two caliper mount bolts. The RX-7 Workshop Manual cautions you against loosening the bridge bolts. You will see two large Phillips head screws and one empty hole in the brake rotors (you'll use the empty hole to brake the disks lose). Use an impact screwdriver with a large Phillips head bit to remove the two rotor screws. You will have to use an impact wrench, there is no way these screws are coming out with a normal screwdriver. After you get the screws out put one of them in the empty hole and drive it in using the impact wrench. This will break the rotor loose and allow its removal.
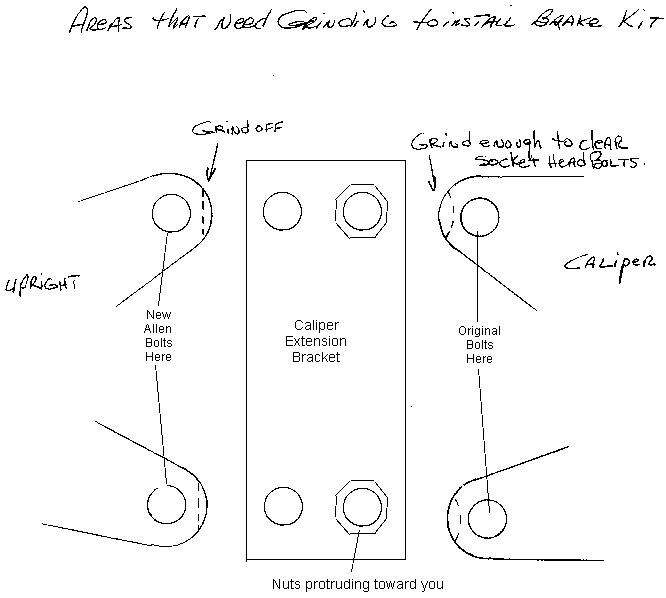
[The brake rotor air guide needs to be modified or removed so it will clear the top and bottom of the new rotors. I trimmed off about1/4 inch on the top flange and removed the bottom flange completely using tin snips. Just slide on the new rotors and you'll see what you have to remove (see photo above). You can ditch the thin metal shim that went between the caliper and caliper mount. The caliper mounts have to be slightly modified to fit. See the caliper modification diagram below to see what to grind or sand off. I tried a die grinder but I got much better results using 6 inch circular 60 grit sandpaper with my electric drill. Just keep grinding until the caliper extension brackets and calipers fit. Mount the supplied caliper extension bracket using the supplied Allen head bolts and torque them to 58-72 foot pounds. Slide on the new rotors and then mount the caliper to the caliper bracket and torque it to 58-72 foot lbs.]
